
Category: “Rolfing — The Ten-Series”
Introduction
“Why is Rolfing ten sessions?” “What is done in each session?” “How do I change by receiving it?”
This Gateway explains the overall picture of Rolfing’s Ten-Series. Links to detailed articles on each session are organized here as well, so reading can begin from whichever session interests the reader.
Why Ten Sessions
Rolfing does not come to an “end” in one or two sessions. Why is it structured as ten?
There is an order to the body’s change. Unless the superficial fascia is released, the Core cannot be approached. Unless the Core structure is organized, integration of the whole does not occur. By keeping this order, the change settles into the body, and the transformation continues even after the sessions end.
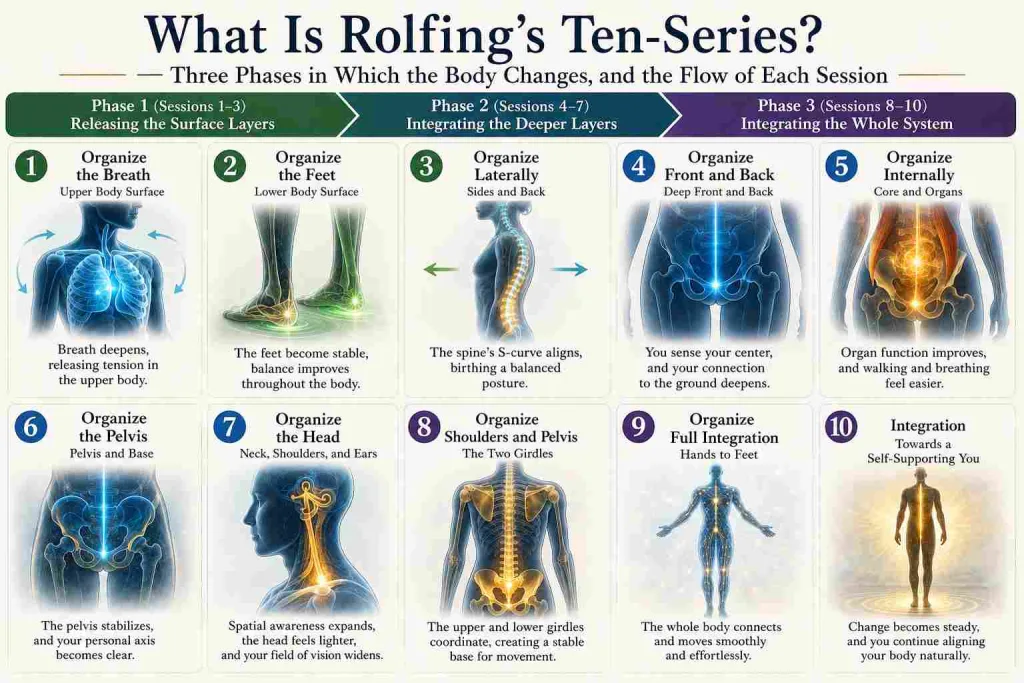
The ten sessions are composed of three phases.
| Phase 1 (sessions 1–3) | Release of the Sleeve |
| ↓ | |
| Phase 2 (sessions 4–7) | Integration of the core |
| ↓ | |
| Phase 3 (sessions 8–10) | Integration of the whole |
In addition, each session has the theme of a “spatial axis.” Seen from the perspective of Embodiment (the integration of bodily sensation) learned in Rolfing training, each session treats a different spatial axis of the body.
Sessions 1–2 are “vertical” (up–down) — organizing the upper body (breath) and the lower body (the soles of the feet), and creating the foundation of the body’s vertical axis. Session 3 is “front–back” — organizing the spine and the front-back balance. From session 4, the “central axis (left–right)” — approaching the core of the body: the pelvic floor, the iliopsoas, and the sacrum. This order, “up–down → front–back → central axis,” is the skeleton of the ten-session structure.
The fundamental difference from massage and seitai lies here. Not “removing the symptom,” but “creating the structure in which the body recovers its original functioning” — this is what Rolfing aims for.
→ How Rolfing Differs from Seitai and Massage — “Symptom” or “Structure”?
How a Session Proceeds
Each session proceeds in the flow of “observe → intervene → re-observe (Test → Intervene → Re-test).”
At the start of a session, the Rolfer observes the client’s way of standing, walking, and breathing (Body Reading). Which areas are over-tensed, and how the body deviates from the axis of gravity — this work of “reading the body” is the starting point of the session.
Next comes an approach to the fascia, and after the session, the way of standing and moving is checked again. When the change is felt not only by the practitioner but by the client themselves, awareness of the body grows. As this “awareness” accumulates, the change persists even after the session ends.
This is what the instructors Ray McCall and Hiroyoshi Tahata emphasized repeatedly in the Advanced Training. The most important thing in Rolfing, they say, is not technique, but the perceptual capacity and the way of being (Being) that “listens” to what the client’s body needs.
Phase 1 (Sessions 1–3): Release of the Sleeve
Release the superficial fascia (the layer that wraps the outside of the body), and create the foundation for approaching the Core.
Session 1: Organizing the breath — the Sleeve of the upper body
What Rolfing treats first is “breath.” Why? Breath is linked with the fascia of the whole body, and when breathing is shallow, the fascia of the whole body tends to stiffen. When the superficial fascia of the rib cage, intercostals, and diaphragm is released and the breath grows deeper, the tension patterns of the whole body begin to ease.
→ Why Do We Start by Adjusting Breathing When Realigning the Body?
Session 2: Organizing the soles of the feet — the Sleeve of the lower body
When the whole foot is tense, that tension is linked, through the fascia, all the way up to the lower back, shoulders, and neck. Session 2 releases the superficial fascia of the soles and the calves. The sensation of the soles seeming to suction onto the ground returns, and the balance of the whole body improves.
→ Why the Soles Matter: Balancing Vision and Hearing in the Second Rolfing Session
Session 3: Organizing the front-back balance — the sides and the spine
To organize the body’s front-back balance, the sides of the shoulders, arms, spine, and thighs are approached. The S-curve of the spine is often collapsed by fascial tension, and organizing this leads to the easing of low-back pain. It is a session in which the experience “I feel like I’ve grown taller” is often reported.
Phase 2 (Sessions 4–7): Integration of the Core
Once the Sleeve is released, the deep fascia can be approached. The parts that correspond to the body’s Core — the deep regions of the pelvis, the viscera, and the spine — are organized.
Session 4: Organizing your own ground — from Sleeve to Core
From session 4, the “Core” is entered. From the surfaces of contact with the floor (the soles of the feet, the sit bones), the sensation of the body’s central axis is cultivated. It is a session of great inner change, in which “a personal sense of ground” and “the sensation of being grounded” shift.
Session 5: Organizing the viscera and the iliopsoas
The movement of the iliopsoas (the deep muscle connecting the hip joint and the spine) and the viscera is organized. When the iliopsoas shortens, the pelvis tilts forward, and the burden on the lower back increases. When this session ends, changes such as “a sensation of power coming from deep in the belly” and “walking has become easier” are often reported.
→ Why the “Iliopsoas” Matters in Organizing the “Movement of the Viscera” — Session 5
Session 6: Organizing the sacrum and the pelvis — the personal axis and sociality
The sacrum and pelvis lie at the center of the body’s center of gravity. When this is organized, the sensation of “a personal axis” is said to shift. When the pelvis stabilizes, even the way of standing, walking, and keeping distance from others can change.
→ Organizing the “Sacrum” and the “Pelvis” — Session 6 — The Personal Axis and Sociality
Session 7: Organizing the neck and shoulders — awakening the inner-ear sense
The last of the integration of the Core is the “neck, shoulders, and inner ear.” The inner ear (the vestibular system) is the sensor that perceives the body’s position in space, and it is deeply involved in postural balance. When the inner-ear sense is awakened, the head comes to rest naturally right above the spine.
It is a session in which experiences such as a widening field of vision, a changed voice, and breathing that grows deeper still are common.
Phase 3 (Sessions 8–10): Integration of the Whole
The final three sessions are “integration sessions.” In sessions 1–7, the work was devoted to organizing each region, but in sessions 8–10, the perspective changes to “what to do so that the whole body can move organically.”
Three questions run through this phase: “What should be done toward the closing?” “What is it that has been learned so far?” “In what direction will things proceed from here?” These are not merely questions of the treatment, but questions to the client themselves.
Session 8: Organizing the shoulder girdle and the pelvic girdle — the two Girdles
Session 8 approaches the two “Girdles” — the shoulder girdle (around the scapulae, clavicles, and sternum) and the pelvic girdle (around the pubis, sit bones, and ilium) — and organizes them so that they can move freely in coordination with each other.
The shoulder girdle becomes the foundation for the movement of the upper limbs (shoulder–elbow–hand), and the pelvic girdle the foundation for the movement of the lower limbs (thigh–shin–foot). When this is organized, the “foundation” of whole-body movement is formed.
→ Session 8: The Shoulder Girdle and the Pelvic Girdle
Session 9: Continuity — connecting the whole, out to the hands and feet
In session 9, from the shoulder girdle and pelvic girdle organized in session 8, the whole is further organized so that it can move in linkage all the way out to the tips of the upper limbs (the hands) and the ends of the lower limbs (the feet). The goal of this session is “linkage” — a state in which, whatever part of the body moves, the whole responds in coordination.
→ Session 9: Continuity— Connecting the Whole, Out to the Hands and Feet
Session 10: Integration — the door to independence
The final session is given while taking in the whole body. More than a technical approach, what matters most is that the client “incorporates into their own life what they have learned through the ten sessions.”
Even after the sessions end, the body’s change continues. What Rolfing offers is not a “finished product” but “a body that continues to transform.” Cultivating the client’s independence — the capacity to notice their own body and to organize it — is the essential aim of the tenth session.
→ Session 10: Integration — The Door to the Client’s Independence
After completing the ten-session series, for those who want to take their integration further, the Advanced series (five sessions) is available. On the foundation of the body built in the ten sessions, it approaches more individual issues and deeper-lying patterns. An Advanced Rolfer holds the qualification to offer these higher-order sessions.
→ Journey to Becoming an Advanced Rolfer — A Summary of the Road to Certification
What occurs through the whole of the sessions is the state Daniel Siegel called “Integration” — differentiated parts connect, and the body begins to move as a single coordinated whole. This integration ripples out not only to physical change but to changes in emotion, thought, and perception.
What Changes Through the Ten Sessions
The physical changes often reported are improved posture, the easing of chronic stiff shoulders and low-back pain, deepened breathing, and improved walking.
But many clients report changes beyond that. “My head has become more organized,” “the ups and downs of my emotions have settled,” “my own axis has become clear” — these occur because, as the body’s structure changes, the patterns of emotion, thought, and the autonomic nervous system change as well.
Here is the reason Rolfing is called “transformation through the body.”
In the Advanced Training, Ray McCall put it this way: “The true aim of Rolfing is to support the client’s body and system and help them walk their own path — it is a process of encouraging the state in which the person is their original self.” Improved posture is no more than the doorway to that transformation.
→ Why Organizing the Body Raises Judgment and Performance — From the Perspective of Rolfing and Brain Science
→ The Three Approaches That Break Through “Understanding Yet Unable to Change” — The Difference Between Therapy, SE, and Rolfing
→ What Does It Mean to Release Effort? (No Excess Force Entering) — How to Organize Posture with Minimal Force
Testimonials
Mr. Kouki Yamada (a physical therapist), having completed the ten sessions, lost 10 kg, saw his low-back pain and knee pain almost vanish, and resolved his insomnia. As a body specialist, it was an experience in which what he “understood in his head” appeared, through the sessions, as a change in his body.
→ Mr. Kouki Yamada’s (Physical Therapist) Ten-Session Experience
Ms. Ayako Kakizaki reported that, along with the improvement of her low-back pain, “in tandem with my inner aspects, I became able to grasp for myself the blockages and stagnations within my body.”
→ Ms. Ayako Kakizaki’s Ten-Session Experience
Going Further into the Ten-Session Articles
Details of each session:
- Session 1: Organizing the Breath
- Session 2: Organizing the Soles of the Feet
- Session 3: Organizing the Front-Back Balance
- Session 4: From Sleeve to Core
- Session 5: The Viscera and the Iliopsoas
- Session 6: The Sacrum and the Pelvis
- Session 7: Organizing the Neck and Shoulders — Awakening the Inner-Ear Sense
- Session 8: The Shoulder Girdle and the Pelvic Girdle
- Session 9: Continuity— Connecting the Whole, Out to the Hands and Feet
- Session 10: Integration — The Door to the Client’s Independence
- What Is an Integration Session? — Sessions from the Eighth Onward — Encouraging the Client’s Independence
- What Does It Mean to Release Effort? (No Excess Force Entering) — How to Organize Posture with Minimal Force
The science of fascia and posture:
- Why Shoulder Pain and Low-Back Pain Are Not Healed by Massage? — The Science of Fascia, Posture, and Gravity
- Why Do Emotions Stay in the Body? ──Understanding Rolfing Through the Body’s Memory — The Science of Fascia, the Autonomic Nervous System, and Trauma
- Why a “Comfortable Posture” Exists — From the Perspective of Gravity, Fascia, and Rolfing
- Why Good Posture Is Not a Matter of Muscle Strength — Tonic Function and Its Relationship to Gravity
The questions “why do I feel this way?” and “why do emotions remain in the body?” are treated, from the perspective of body psychology and brain science, in Mind and Bodywork Lab’s “Recognition OS” series.
→ Mind and Bodywork Lab: How to Navigate This Site (only in Japanese, English version in preparation)
A trial session is the place to begin, confirming what is happening in the body.
For Those Who Have Completed the Ten Sessions, or Want to Go Further
After completing the ten sessions, when a sense remains that “there is still a layer that hasn’t been reached” — an Advanced Rolfer’s session is aimed at reaching that layer. I explain the three differences from the Basic level.
For those who have taken an interest in Rolfing and want to become a Rolfer themselves — I explain the differences among the certifying bodies (DIRI, ERA, ABR) and the full picture from Basic to Advanced certification.
Hidefumi Otsuka (Ph.D.) | Certified Advanced Rolfer™ / Rolf Movement Practitioner
Completed a doctoral program at the Graduate School of Medicine, the University of Tokyo. After a career in the pharmaceutical industry, has offered Rolfing® sessions in Shibuya since 2015. Works under the theme of “the integration of thought, emotion, and body.”